

How to Prepare
Pool
Are the pool and its components currently in stock? If not, when can we expect their availability? This information is crucial when you call to schedule the installation date.
Permits
The homeowner is responsible for obtaining the permit. We suggest reaching out to the township/county soon after purchasing the pool to prevent any possible delays in the installation date. Click here to find information on permits.
Electric
You will need to have an electrician install a ground fault breaker for the filter system. This should be scheduled after the pool is installed.
Water
Do you have public water or well water? If you have public water, the pool can be filled with your hose. If you have well water, you may want to consider having the water trucked in. Our office can provide you with referrals and explain how to schedule the water.
Filter
Know where you want your filtration system placed and mark that spot.
Tip: Try to place the filter system on the same side of the pool where your home’s main electric box is located to provide a straight run from one to the other. This will make the installation easier for the electrician.
Ground Leveling
Scheduling
Our team will reach out to you to set up an excavation time 1 to 7 days in advance of your installation date. For a visual representation of our leveling process and to gauge the pool site’s levelness, refer to the provided illustrations below.
Access
We require a 6ft opening for the machine to access the yard for pool sizes starting at 21ft for rounds and 12x18ft for ovals. If the pool is smaller than the mentioned sizes, we can provide smaller equipment that fits through a 3ft standard gate opening for an additional fee. It’s the customer’s responsibility to ensure this opening is ready before the scheduled installation date. If providing 6 ft. access for the larger pools is not feasible, kindly inform us so that we can make alternative arrangements for the groundwork.
Clean Up
Anticipate the need to tidy up your yard post-pool installation, as the pool site functions as a construction area. There will likely be tire tracks where the machinery traversed the yard to reach the pool site and the sand. Waste materials, including dirt, rocks, roots, etc., will be piled in a designated area within the yard. Please note that C&D’s Installers do not remove any materials from the customer’s yard. The size and quantity of the pile will vary based on the extent of ground leveling required, as each yard presents unique characteristics.
Customer Responsibility
Filling The Pool
At the end of installation, we will initiate filling the pool with 1-2 inches of water using your hose to set the liner. You will be responsible for ensuring the pool is filled to the correct water level. (The installers will show you where the proper level is before leaving).
Excess Sand
When scheduling the installation, our office will inform you of how much sand to order based on the pool size. We advise ordering the recommended amount unless you have additional plans for the excess. If any sand remains, it is your responsibility to clean up and remove it. Having a surplus of sand is preferable to not having enough.
Excess Ground Materials
Leftover ground materials resulting from necessary leveling during the installation will be placed in any designated area within a 50ft radius, as per your request.
Backfilling The Pool
Once the pool is filled to the proper water level, it’s crucial to cover the entire bottom rim immediately. Do not commence back-filling until the pool is entirely filled. We suggest using heavy plastic (as recommended by the manufacturer) before backfilling. Extend the plastic up the pool wall by 8 inches and then place the chosen backfill material (such as dirt, mulch, or rocks) on top. The plastic serves the purpose of shielding the sand from rainwater, splashing, and preventing the formation of sinkholes. Additionally, it offers protection to the pool wall, as specific materials have the potential to cause damage.
How to Survey for your Pool Installation
- STEP 1
Stake out the pool in a desired area of the yard. Place stakes and string lines as indicated. (See illustrations for round or oval pools) - STEP 2
Locate the most obvious high stake in the area staked out. - STEP 3
Tie a string to the highest stake flush with the ground. - STEP 4
Run the string line to the most obvious low stake in the staked out area. Now put a line level on the string, pull the string tight, to make it level, and tie it to the lowest stake, making sure the string stays level. - STEP 5
Use a tape measure to measure the distance from the ground to the leveled string at the lowest stake. This is approximately how far out of level your yard is. You may have to measure several different areas to get a good idea how far out of level your yard is.

The Pool Location
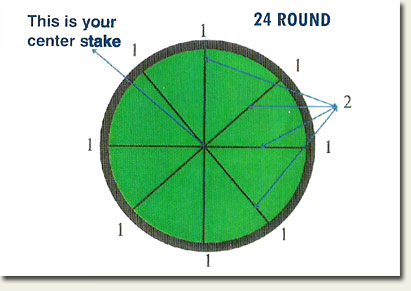
Round Pools
Stake out the pool area 4 ft. larger all the way around than the actual pool size. EXAMPLE: A 24 ft. round pool would be staked out 16 ft. from the center stake to all other stakes to give you a 32 ft. diameter.
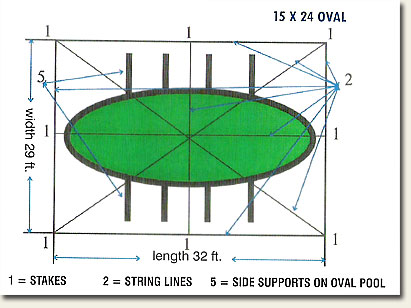
Oval Pools
Make the staked out area a rectangle. For the length add an additional 8 ft. (4 ft. at each end). To get the width measurement add together the pool’s width + side supports + 8 ft. for water run off (4 ft. on each side). If you are unsure of the side supports size contact the dealer where you purchased the pool. EXAMPLE: Measuring for a 15’ x 24’ oval pool with side supports extending 3 ft. on each side. To get the width add the three measurements together 15 ft. width + 6 ft. for side supports + 8 ft. for water run off = 29 ft. total width. Then to get the length add 24 ft. + 8 ft. = 32 ft. total length. Therefore a 15×24 pool will need a 29 ft. x 32 ft. area.
Things to Consider in Selecting the Pool Location
- Tree Stumps
- Small Trees Bushes / Shrubs
- Clothesline Poles
- Swing Sets
- Other Objects
If you have any of the items listed above in the area where the pool is going, we strongly suggest having them completely removed before the installation date.
Tip: If you have a tree stump(s) it is best to have them pulled out. If this can not be done, have the stump(s) ground down as far as possible.
We Have The Equipment To Get The Job Done!
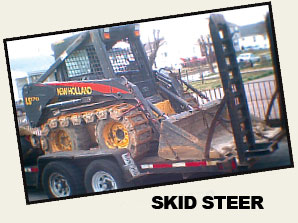
| SKID STEER This machine is used on larger pools. For round pools 21 ft. or larger. For oval pools 12` x 21` or larger. We need a 6ft. opening for the bobcat to get into the back yard. |
 |
|
SMALL SKID STEER & GRAVELY TRACTOR |
 |
The Finished Excavation Site
The site will need to be excavated larger than the actual pool size. Our standard is to excavate the site 4 ft. larger all the way around the entire pool. However this may be more/less than what your township or county requires. There is no uniform code between townships/counties. You can get this information by contacting your township or county zoning office.
Note: Our Foreman MUST know this information for the pool to pass inspection.The high cut edge of your yard has to be back cut on an angle, so there is not a severe drop off. (see illustration below) You may need to build a retaining wall to protect the exposed earth. This will depend on how much ground leveling is needed.
